How to Change User Profile default location in Windows 7/8 Registry
If you have Windows 7, 8 or Vista installed in your computer, the default location of your User Profile will usually be in the same partition as where your system was installed. For example, if your Windows 8/7 was installed in C:\Windows, your user profile will probably be located in C:\Users.
However, some users prefer to store their user profiles in a different partition from the partition where Windows is installed. This comes in handy especially if you have a SSD for the sake of your Windows system files. If anything happen with your windows, for instance, an unexpected crash occurs that requires you to format your system partition, you may lose all your important data and files stored in your user profile.
It is entirely up to you if you want to change your User Profile location. But it is in fact one of our first must-do steps after installing a fresh new OS on our computers. We wouldn’t want to risk losing important data and files just because Windows crashes by some silly reasons.
The tutorial below will guide you through the steps to change the user profile default location in Windows 7/8/Vista. What you are about to do are basically to change some registry sub-keys, relog and copy the user profile to your preferred new location.

How to Change the User Profile default location in Windows 7/8/Vista
1. Please do a backup of your user profile before proceeding. You can also create a system restore point for backup in case if you’ve done anything seriously wrong in the following steps, you can restore your computer via the safe mode.
2. Copy the original user profile folder in the default location (usually in C:\Users) to the new location. (The directory is hidden by default, you’ll need to reveal them by going to Tools > Folder Options > View (tab) > Show Hidden files, folders, and drivers) In my case, I’ll copy the folder named “Alvin” [Your user account name] from C:\Users to D:\Users directory.

3. Click Start, then type regedit in the search box and hit enter. This is to open the Registry Edit.
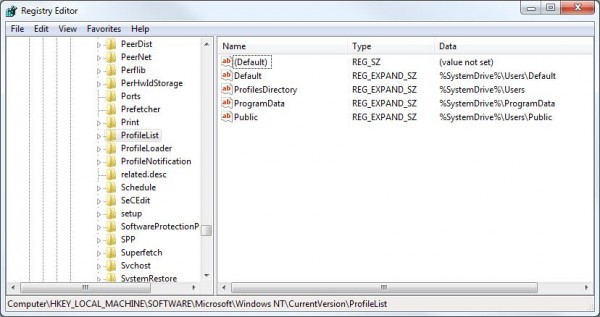
4. Navigate to HKEY_LOCAL_MACHINE/SOFTWARE/MICROSOFT/WINDOWS NT/CurrentVersion/ProfileList. You should be able to see this:

5. Change the value of the Default, Profile Directory and Public keys to the new location of where you’ve just pasted your User Profile accordingly. In my case, I’ve just copied my User Profile and pasted it into D:/Users directory. So I’ve to set the keys to the new location as shown in the screenshot below:

6. Log off now and login again. Now your computer should be using the new User Profile set in the new location.
7. You may now delete your old account folder in C:\Users.
8. If everything works fine after that, congratulation, you’ve just completed the tutorial and successfully moved your user profile location.
Error: Some library features are unavailable due to unsupported library locations

If you’ve done everything and still an error message came up to you in your user profile directory showing that “Some library features are unavailable due to unsupported library locations. Click here to learn more”, this indicates that you did something wrong in the previous tutorial. Check if you have the miss spell the directory name, and also make sure you have relog your account in order for it to take effect.
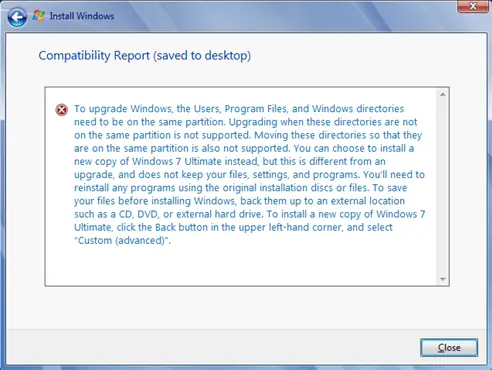
Error: To upgrade Windows, the Users, Program Files, and Windows directories need to be on the same partition

If you get this error while upgrading, migrating or reparing your Windows, it means that the current user profile you’ve set is on a different partition from where your Windows is located. You will need to undo the change, and set it back to the default directory before you can proceed upgrading your Windows. Otherwise, it won’t work.
- Open RegEdit and navigate HKEY/Microsoft/Winodws NT/CurrentVersion/ProfileList. Change ProfileDirectory (in Windows XP, it’s ProfileImagePath) registry key back to the default directory in the partition where your system located. For example, if your windows is installed in C:\ then change it the key to C:\Users.
- Start the Windows Update or Windows Anytime Upgrade process. Now it should work just fine after the compatibility check is passed and you’ll once again be eligible for the upgrade.
- When you’ve finished your upgrade, before you relog your user account, change the Profile Directory registry key back to where you’ve previously set.


