How to Change Windows Live Messenger or Skype Language
Update: Ever since Windows Live Messenger has been combined with Skype, whatever you are about to configure should be through Skype interface. You may skip the first part of the post below and go for the updated part for methods to change language for current Windows Live Messenger Skype’s language.
How to Change Windows Live Messenger Language
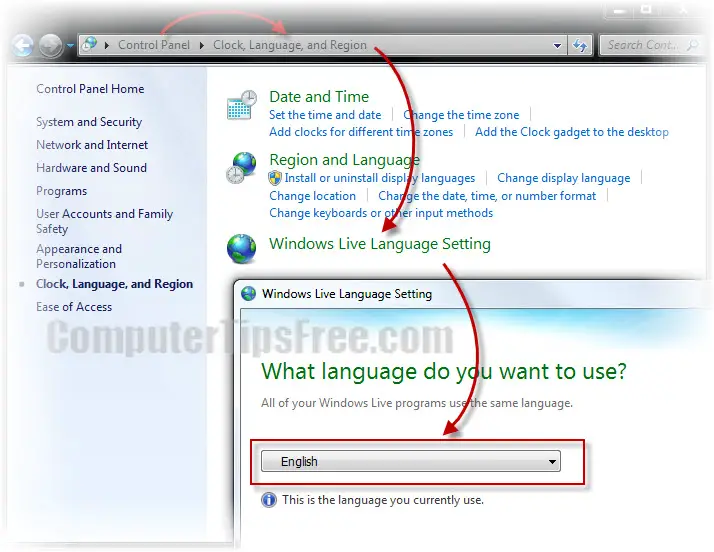
In order to change the language for WLM 2011, you have to change the language of the entire Windows Live Essential 2011 suite, which will then be applied to all other Windows Live services such as Photo Gallery, Movie Maker, Mail, etc. You can easily change the language user interface to different language from language selection settings. To do so:
- Click Start -> Control Panel.
- Click on Clock, Language, and Region.
- Next click on Windows Live Language Setting.
- In the pop up window, select your desired language from the drop down menu and then click Ok.

In some rare cases, people reported that this doesn’t work. Majority of them are because their regional language has force Windows Live Messenger to show in that particular language set, rather than the Windows live language. Well, changing your computer’s regional language might work too (depending on the version of Windows Live Messenger you are using), but in that case, your entire Windows will be of that language set in the regional language setting. You will have to find a way to balance this.
How to Change Skype (Windows Live Messenger merged) Language
[Update] Now that Windows Live Messenger has been merged with Skype, your friend list will go right into the Skype contact list. Other than allowing you to chat in plain text, you get to call or text your friends instantly using the Skype call features. The basic settings of WLM will all be based on Skype’s default settings. Whatever that you want to configure, including changing language of the entire client, you will have to do it via Skype interface as well.
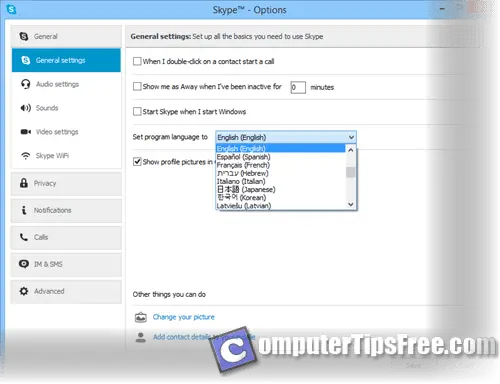
To change your Skype’s language, open your Skype, go to Tools, and then Options. Select General Settings from the left panel, and set your preferred language under “Set program language to” column. Press OK when you’re done. Relaunch Skype and it should launch with the language you’ve set previously.

If in any case you are unable to reach this option just because the default language of your Skype is already a messed (for instance, Japanese, Chinese or Arabic that we have no clue of, not even a single word in the interface), which happens to us quite often mostly when we were traveling around for businesses and had to use foreign computers that are usually in foreign language, the only way left is to head to the Windows Region and Language Settings from Control Panel (can be found in by going to Start > search for “Region and Language”), and then change it to English (United States) or whatever language you prefer. It may require a restart afterward. Once your machine is restarted, in most cases, programs now will appear in the language that you have set in Region and Language.


