How to Increase Download Speed in Windows 7/8/Vista
If you are experiencing a slow down in browsing or download speed while surfing the web or downloading files from the internet, you may want to try applying tweaks in this post about how to increase download speed in Windows 7/8/Vista.
Before we begin, let us explain what we meant by a “slow down”. If you feel that your internet download speed is not as fast as before especially after upgrading to Windows Vista, or after a major event happened in your computer, you can call that a slow down.
If you just have the thoughts that your internet is slower than that of your friends or neighbors, well, it can be other reason which you most likely can’t do anything about it. If your internet speed is bottle-necked or capped by your ISP (internet service provider) as to match the maximum bandwidth allowed in your internet package, you can either pay more to get faster or change to a better ISP.
If you are experiencing a slow down only in some certain websites, in most cases, it is the websites that should be blamed, not yours.
If you are experiencing lagness while playing online games (mmorpg, moba, etc), it’s most likely that you are too further away from the server which gives you a high latency in which case there’s nothing you can do about it.
Well, if none of the above match your case, you can continue with the tweaks below.

Clean Junks, Remove Addons and Plugins, Check for Viruses
Ironically, this can be annoying that you have to see this over and over again in other websites that are talking about the same topic relating to speed up tips around the internet. Well, it is still true that the most common causes of a internet browsing and download speed slow down are either you have too much addons or plugins in your browser that take away your bandwidth, viruses hiding behind your computer system files that continuously running in the background which hogging away your internet speed, or junks files that always have been problems to your computer. So let’s clean them one by one.
I’m pretty sure we don’t have to teach you about virus scanning. You can use any of the antivirus software to check your computer for viruses. We recommend Avast Free Protection.
As for junks, addons and plugins, you can use certain tools such as the very much popular CCleaner (Google it) or Baidu PC Faster to one-click wipe out the junks from your computer. Trust me, you will be surprised for how much junks you have in your computer. Some can be deadly though.
How to Increase Download Speed – Tweaks for Windows 7 or Vista only
The below tweaks are among the most commonly used and spread across the forums and are originally intended for only Windows Vista. We have not personally tried it on Windows 7 and thus it may not work if you are on a Windows 7 machine. Please proceed at your own risk.
- Open Internet Explorer.
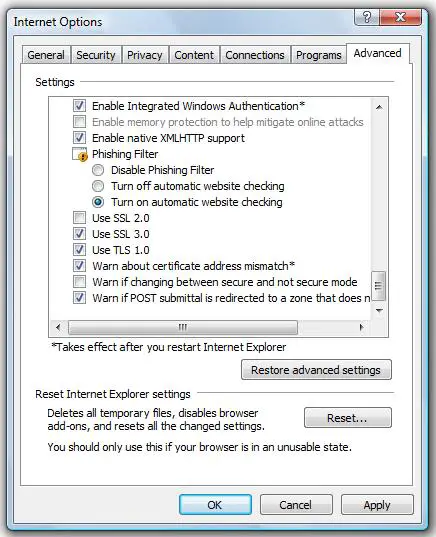
- Click on Tools and then select Internet Options.
- Click on Advanced tab.
- From the settings, scroll all the way to the bottom.
- Check the box of Use SSL 2.0 (Secure Sockets Layer) and uncheck the box of Use TLS 1.0 (Transport Layer Security).

Advanced Workaround – How to Increase Download Speed – Windows Vista only
Update: There are several reports regarding the restoration of TCP autotuning didn’t work after applying the command. Thus, we do not recommend you to try this tweak. This tweak is only for pro and advanced users who know exactly what they are doing. Please proceed at your own risk.
By default, the TCP autotuning is enabled in Windows Vista. Many websites do not respond well with this feature. So these sites are loaded slowly.
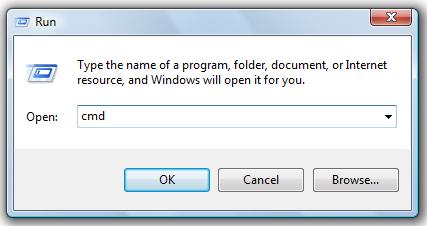
- To disable TCP autotuning feature, first open the Run option from the Start menu.
- Type cmd in the box of Run option.

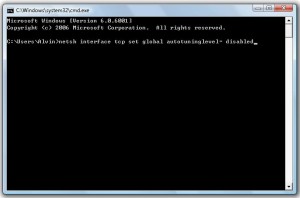
- A command prompt will show up, type netsh interface tcp set global autotuninglevel= disabled in it and then hit enter.

- The TCP autotuning should be disabled now. Close the command prompt and restart your computer.
- To restore or re-enable the TCP autotuning feature,
- Type cmd to the Run option and then type netsh interface tcp set global autotuninglevel= normal in the command prompt. Press enter, close it and then restart your computer.
- The TCP autotuning should be enabled now.


